Tuesday, June 30, 2009

Who’da thunk?

+ = Good
++ = Very Good
+++ = Excellent

I got my comment sheet back from the judges for the Boise Basin Quilters 2009 Quilt Show.

EleanorSurpriseQuiltShow For the Design components, which include Use of Color & Fabric, Top Design, and Quilting Design, I got a “+”.

I got a “++” for Workmanship, which includes technique (precision, stitches, grain line, shadow-through).

My “+++” rating came from…drum roll, please…..Finishing! The judges comment was “wonderful binding”.

So, I guess it does pay off to hand stitch binding down, eh? Or was it the milliner’s needle I liked so well?

Thursday, June 18, 2009

How to Pin a Quilt onto the Leaders

Jennie Kerwood, a new ABM Innova dealer in NY, posted her method of how to pin a quilt onto the leaders.

Her explanation is quite detailed, easy to read, and easy to follow; you can't go wrong if you follow her directions.

I do a couple of steps differently, mainly pinning from the back. I could never seem to get the pins on top where I could see them, once I was ready to attach the backing, and this was causing the pin heads to drag on the arm of the machine or on the ruler plate.

In order to accomplish this, I let the leader out and keep it wrapped around the bottom bar and up over the top bar towards me so I don't have to lean over the table.

Once it’s pinned, I can roll it onto the take up bar to get to the end of the back and start pinning to the belly bar at the front of the machine.

Hope this makes sense!

Wednesday, June 10, 2009

Binding, hand sewing and needles

I usually sew my bindings on by machine, as I'm not much for hand sewing. It's not that I can't sew a slip stitch, it's that I don't want to take the time it requires to do it, I want to move on to the next project.

Well, it just didn't seem right for this quilt, the one I'm finishing for the quilt show. Maybe it is the batik border, maybe it's peer pressure. No, actually, it's that I cut my binding at 2 1/2" instead of 2 1/4" and when I wrap it around to the back, the binding isn't filled out with the quilt sandwich if I only bring it to the seam line. So, I have to bring the binding beyond the stitching line, making it wider in the back than the front. That would leave me with a lip on the back if I used SID from the front, or it would leave me with an "inside line" of stitching next to the binding around the entire quilt. Depending on the project, that's not an entirely unacceptable solution, so maybe it is the batik!

I started out with a quilting needle. Two different brands, even. Those needles were so hard to pull through the fabric that my thumb joint was literally sore the next day.... and I hadn't even finished an entire side yet!

The next needle I tried was a John James Gold'nGlide size 10 milliner's needle, and I can't believe the difference! The difference isn't so much the length as it is the "girth" of the needle, and the eye isn't larger at the end, like the quilting needle. I haven't had to squeeze the needle to try to pull it through, it just slides right through my fabric....my BATIK fabric!

These needles are not the same as some other milliner's needles. I picked up a variety package of Piecemakers milliner's needles before I realized I had the other ones. The eyes of those needles seem a bit larger than the John James needles. I haven't used them, and since I found something I really love, I'm going to see if I can return them. No use messing with success.

I might just consider hand sewing ALL my bindings!......

Saturday, June 6, 2009

June 13th deadline - the rush is on!

So, with all of the changes we made to the studio on Memorial Day weekend, I just had to put my theory into practice....and get my quilt done in time for the quilt show that I already entered it into!

eleanor-top-sm This is a Turning Twenty Again pattern, measuring 89" x 75"

I used a batik border and a batik back, and there is at least one batik in the piecing.  This is the first time I've quilted a project with batik...and it was a learning experience!

PolyQuilter-Oceans I loaded this quilt last Sunday and proceeded to mess around with trying to get my tension right.  You see, I can't use the same stitching scenario all the time!  The Innova handles all kinds of threads, and I want to experiment!  That's what gets me in trouble, I guess... ;-)

I used a new-to-me thread called PolyQuilter, from Superior Threads, which is a 19 wt spun polyester thread that feels like cotton.  It's really soft, and it is just gorgeous!  I didn't pay attention to the weight of the thread on the package, and it never occurred to me I would have to make adjustments, as you would with a decorative thread.  Well, maybe that's just me....

I only realized it was such a fat thread when I went to thread the needle.  It was much easier to use the size 18 needle just to get it through the eye, which worked out really well because of the batik back.  I like to test my tension on loops and swirls in order to test everything I might encounter during the actual quilting.  I've used an 18 before with no problems, but, for some reason, I ended up needing to re-time the machine this time because I was getting skipped stitches on my practice loops.  

This, of course, necessitated a call to ABM technical support, which is always great.  Michael was very patient with me as he walked me through several steps, making sure I was liking how the tension was set and how the thread laid on the back.  In order to not have the threads "lying on the top of the fabric" we ended up moving the needle bar height so that the hopping foot was about a dime's height above the quilt top, where I usually have it set to a nickel's height.   However, by the time that was all set, it was time to go to bed!

I used Willow Leaf Studio's Koko pantograph.  Although I've used a pantograph before, this is the first panto I've used on my machine.  Koko pantogragh Overall it was a pretty easy pattern to follow, although I found that I jerked on the edges of the little musical instrument too much and I have several points, rather than rounded edges.  That was probably me going too fast, as I have a tendency to be impatient.   Also, since I have the 26" machine, I wish I had more than one row on the pattern so I didn't have to roll so much.  Once I figured out the placement and rolling technique, I started to feel much more comfortable with the entire process.  I used about
1- 1/2 rows per bobbin, and I used about 8 bobbins.

I LOVE how the thread looks on the back!  It's actually more interesting than how it looks on the front.  This is part of that learning experience I was talking about...

closeup of design on back

So, this quilt has taken me a whole week to complete, except for the binding, which I am going to finish this weekend. Resting

Monday, May 25, 2009

Studio Updated!!

Lots of work on the house this Memorial Day weekend!  We purchased a small flat screen TV for the exercise room and for the sewing studio and mounted them on the walls, along with shelves in each room to try to economize the space.

I asked DH to make the corners rounded, and he obliged.  I have already saved myself some injury when I bumped my hand into one of the shelves while I was arranging items.  I am so glad he installed the screws at the end of the brackets to secure the shelves!

If you haven't seen my studio before, here is the preview picture from March, 2009.SewingRoom-March2009-sm

And today, Memorial Day 2009, here is the updated photo of the sewing area: 

UpdatedSewingRoom-sm

I am SO excited about the new arrangement!  I hope I can keep it this organized when I'm working on my projects.

I am also planning to bring a computer into the area and connect it to the mounted TV screen.  I'll have to figure out how to store the keyboard and mouse when I'm not using them, but having a computer here allows me to work with clients in this area without running up and down the stairs, and I'm really excited about that!

I will be able to rearrange the other end of the room so that I can move the cutting table closer to the wall, which will increase the area on the free motion side of the quilting machine.  You don't want to see a picture of that area right now, I can assure you!

Thursday, May 14, 2009

Animals in the Park

Animals in the parkI've been so busy quilting and trying to keep up with the normal life events that I have hardly gotten the pictures off my camera.  I've been dying to get some time to post some of my progress!

This one was done at the end of  April.  It's another baby quilt for my guild.  The top was donated, it has a mitered corner border applied around the outside of the panel.

I just loved the print, it called out "pink" to me, so I quilted it with Superior's Rainbows thread, both top and bottom.  It's a variegated thread, and has a slight sheen to it, and I had to use one of the thread bras to keep the thread from puddling off the cone while I was quilting it.  But it really came out nice, and I didn't have any problems with the tension once I got it set.  closeup of meandering quilting I put a very bright pink flannel back on it, and even reduced my stash in the process!  That's what a stash is for, I guess!closeup of pink flannel

Monday, April 20, 2009

Garden 2009 - the Next Steps

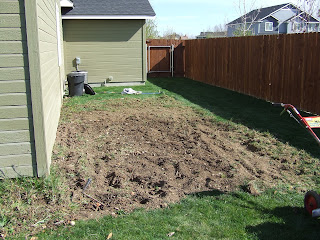
So this is the area I started on last weekend, pulling weeds with the dandelion digger. My chiropractor rolled his eyes at me when I said "Well, it HAD to be done!"

My husband rototilled for me this weekend, and even took out another couple of feet of grass so I can expand. Next year, another couple of feet!

Hubby also rototilled one of the sprinker heads! Oops! Not a problem, that just encouraged me to implement a soaker hose option for the area that I've been talking about for 3 years. Can't believe I didn't do it sooner, as the head was only about $6 and 50' of soaker hose was another $6.50.

Check out our new compost bin, too! We sort of made it up as we went, didn't follow any instructions, but made it out of a black garbage can, cut a hole in the bottom and put a side opening on it, with a handle. I can't wait to get some black gold out of it!


I took out the corner rose bush and transplanted it to another area in the front yard. It was almost on top of the underground sprinkler head, so it was rather ineffective anyway, and I was always worried about mildew, even though it got plenty of sun. That's probably what saved it!

So, yesterday I was a bit sore overall, raking and pulling weeds was very good for me, but I kept it to a minimum and my hands didn't get overworked.

So, I sewed!
Posted by Picasa

Print Friendly